0 DTE stands for strategies that expire on the day of opening them, hence there is 0 day to expiration. The most popular underlying for these strategies are SPY and SPX. I like SPX better because more strikes are available to build the strategy.
In this article, I would like to show you how I hunt for 0 DTE SPX broken-wing butterflies (BWB) using the scanner.
The main idea behind using a 0 DTE BWB is that it should be somewhat directional and executed for credit. So if I am wrong about the intraday direction of the market, I will not lose anything, it will expire worthlessly and I get to keep the premium.
Here is how I would configure the scanner using the input fields if I think that the market is going up intraday:

Let’s discuss each field and why they are set the way I did.
Ticker: “SPX”, but it can also be a list of tickers including SPY.
Option: “call” means I am looking only for call butterflies because I think the market is heading north intraday.
Price: “-500 – 0” means I am only interested in butterflies that have negative prices, a credit.
DTE: “0 – 0”, expiration should be today.
Front delta: “5 – 50” defines the delta of the front leg of the butterfly spread. I will leave it in a very wide interval so that I will see all the spreads to choose from regarding strikes and technical resistance levels.
Delta: “-2 – 100” is the net delta of the position. Ideally, I would want to see a positive net delta, but that is usually not available. So I am trying to limit how negative the net delta should be at max. In this example, I am only allowing a -2 net delta, which makes it a bit OTM.
FLY type: there are 3 types of butterfly configurations to choose from 1/-2/1, 1/-3/2, and 2/-3/1. For this specific 0 DTE setup, I am using 1/-2/1.
Strike diff: “0”, this is a “joker” character, which means if I specify 0 as a strike difference, it will scan for all the possible combinations that meet my criteria. Since I don’t want to stick with any strike differences, I need to use 0 to see all.
BWB: “0”, this is also set to 0 because I don’t want to specify the broken wing part’s strike difference. Using 0, I will see all the combinations it can show me.
R/R: “200 – 10000” means I am looking for spreads that have a reward-to-risk ratio of at least 200%. In a BWB configuration, this means that the theoretical max profit of the spread is 200% compared to the max loss on the broken wing side.
C/W: “0 – 100” stands for the percentage of credit/width I get for shorting the extra embedded vertical that is found on the broken wing side. The higher it is, the more credit I need to receive. For this configuration, I left it on the default values.
Range: “0 – 100” defines how wide the breakeven range in percentage should be in the butterfly spread. I left it on default.
After running the scanner, here are the results.
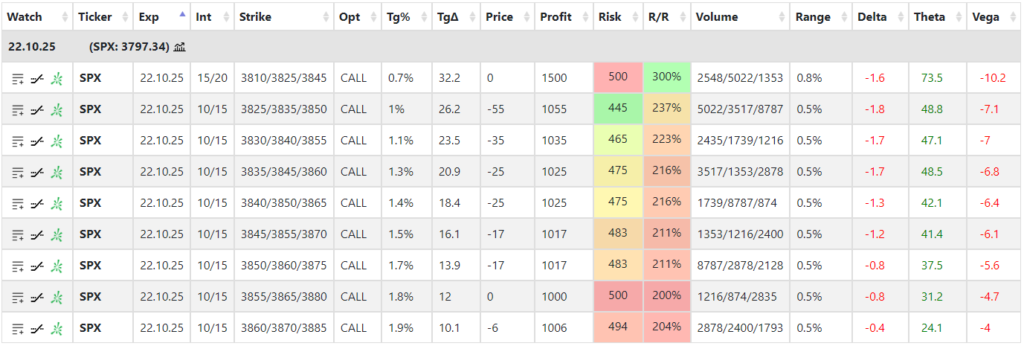
Let’s go through what the columns mean.
Exp: the expiration of the butterfly.
Int: the strike intervals (differences) between the legs. As you can see most of the spreads have 10/15 intervals and one has 15/20.
Strike: the exact butterfly strikes.
Opt: option is either call or put, depending on your market direction.
Tg%: target %, how far the strike is in percentage move from the current stock price.
TgΔ: the target delta of the spread which is the middle strike’s delta in this case.
Price: credit for the butterfly.
Profit: the theoretical max. profit you can make on the spread.
Risk: the risk of the trade, in this case, the broken wing part.
R/R: reward to risk in percentage.
Volume: each leg’s daily volume.
Range: what is the price range in percentage between the breakeven points of the spread (how wide it is).
Delta: net delta of the spread. Remember I set it to have max -2.
Theta: net theta of the spread.
Vega: net vega of the spread.
First I always sort the table by Tg% to see which ones are the furthest from the money where I will have to highest probability of not getting into trouble (being ITM).
In this example, I can see that the furthest strike is 3870 which is 1.9% from the current SPX price and I could get around $5 as a credit. So if the market tanks, the most I can make is $5 at expiration.
I always try to select my target price based on intraday support & resistance. If I am not finding a suitable spread against a market level, I will pass the trade.
As you can see from the table, the highest R/R (300%) has 15/20 strike intervals and 3825 as the center strike which is the closest to the money, being only 0.7% away from the current price. It pays the best but has the most risks in terms of probability.
Let’s get notified
I can save this scan as a favorite and later on reuse it or enable an alert and get notified whenever there is a new one found in the market.
If you click on ![]() icon you can name this scan:
icon you can name this scan:

I have named it “0 DTE credit”. After saving it, you can select it from the dropdown list and if you click on the ![]() icon an alert is enabled for this scan. It means that the scanner will search the market every 5 minutes to look for spreads that meet these criteria.
icon an alert is enabled for this scan. It means that the scanner will search the market every 5 minutes to look for spreads that meet these criteria.

If anything is found, you get an email about it. Don’t worry, it will not spam you with the same spreads every 5 minutes. After a spread is found and sent via email, only new ones will be sent afterward.
Sometimes during a very volatile market, I can still see very good pricing on these BWBs approaching the end of the day which is rare. The best setups are usually available in the first 30-60 minutes of trading.
Butterfly scanner guide
For a more detailed explanation of how to use this spread scanner please watch the following video.
Follow for more ideas
If you are interested in more ways how to harness the power of the scanner, please subscribe below.